SHOP TIPS FOR THE DIY REPAIR
Have you ever wondered how to properly install a control arm, press in a ball joint or change a tie rod end like the pros? Has it crossed your mind that there might be easier ways to remove the old part and get ready for the new install? To help simplify your next repair, read on for best practices and pro tips straight from the shop.
 What we’ll cover:
- What to do and have on-hand before you start
- Disassembly and preparation best practices
- Chassis installation tips
- Must-know tricks of the trade
Before Starting a Repair
Here are some things to consider before you even begin a DIY repair.
Safety Considerations
Make sure your work area is level, away from traffic, properly ventilated and well lit. Have fire suppression equipment and a first aid kit on-hand, as well as a work buddy nearby. The right protective gear is also essential, including:
- Eye Protection: Safety glasses/face shield

- Skin Protection: Appropriate clothing
- Lung protection: Dust mask/respirator
- Hand Protection: Gloves
- Hearing Protection: Ear plugs/muffs
Required Information
Make sure you know the vehicle’s year/make/model, build date, trim package/level, VIN, mileage, tire size and driveline details. Always consult the vehicle’s service manual for testing and inspection, repair procedures and technical specifications, including torque specs, installation sequences and other critical info.
Tools and Equipment
Plan ahead and get your complete list of items from the parts store so you don’t have to go multiple times. Don’t forget to include essentials like shop towels, catch pans, drop cloths, penetrating oil and any other chemicals or fluids required.
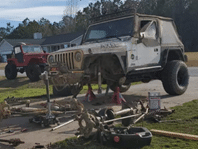
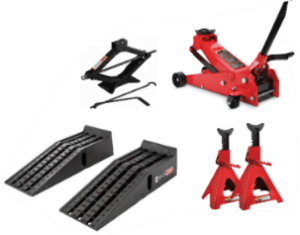 Assemble the right tools and equipment for the job before starting the repair, including hand tools and equipment to raise and then support the vehicle. Remember that floor jacks are not designed to sustain the vehicle’s load, so use jack stands. If raising the vehicle is required, always do so using the procedure outlined in the factory service manual.
Diagnostics
Figure out why the repair is needed, not just what needs to be repaired. Always ensure replacement parts are correct and that they match the critical dimensions of the original components. While materials and appearances may vary, certain dimensions cannot be changed.
Disassembly and Prep
To make the removal of nuts and bolts easier, use a small amount of penetrating oil on each fastener, allowing it to soak in properly. Disassemble and remove parts with care, so you don’t accidentally damage other areas.
Stay Organized
Keep fasteners and any parts removed in a neat and organized area in the order of removal. If possible, keep fasteners with their corresponding parts.
Inspect as You Go
Check for anything that may need repair or replacement as you go. Look for any irregularities, such as cracks, distortion, deformation and corrosion that may compromise your repair.
Keep it Clean
 Cleaning before assembly is arguably the most important step in the process, especially if the area is highly corroded. Pay special attention to any mating areas or surfaces that work with a seal.
Chassis Installation Tips
Now that you’re ready for your DIY install, here are some installation tips for key chassis components.
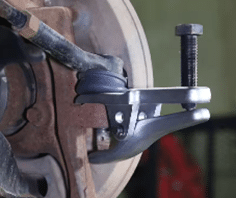
Press-In Ball Joints
- Use the proper cup adaptors and press when installing a ball joint.
- Cups should rest against the mounting flange on the ball joint when pressing into place.
- Never press against the ball joint stud, back of housing or closure area on the ball joint housing.
Inner Tie Rod
- Before removal, measure from the back of the inner tie rod housing to the center of the outer tie rod ball stud housing.
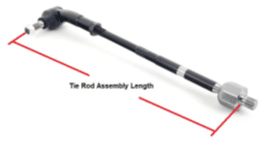
- Use this measurement when installing the replacement tie rod end so the vehicle can be driven to the alignment shop.
Outer Tie Rod
- Before loosening, index the jamb nut to the inner tie rod with a white grease marker or liquid paper.
- Loosen jamb nut, then remove and replace outer tie rod end.
- Use the indexing mark to ensure the new tie rod is in the same place as the original.
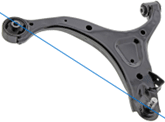
Control Arm
- Always torque the bushings of a control arm with the arm positioned as if the vehicle were at static ride height.
- This prevents overloading the bushings, which can cause stress and premature wear.
Voided Bushings
- When replacing a control arm bushing that has voids, orient the bushing so a line intersecting the voids will pass through the center of the ball joint.
Friction Bushings
- Never use petroleum-based greases or lubricants to set friction bushings into place.
- Instead, use a soapy water solution, which will dissipate and allow the bushing to grip the surface as intended.
- Liquid tire mounting lube can also be used.
Other Tricks of the Trade
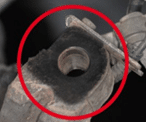
 Separate a Taper Lock
Pick up a tie rod or ball joint separator to help you disconnect a taper lock (if you don’t have the experience of dealing with them daily), to avoid frustration.
 Wet Sealing Area
After cleaning the surfaces surrounding the taper holes, rub a small amount of grease on the sides the dust boot is going to work against. This ensures a good sealing area and also provides the boot with a nicely lubricated surface to glide against.
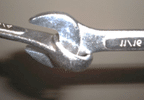
The Double Wrench
If you need a little extra leverage to take off a stubborn nut or bolt, lock the ends of similar-sized box wrenches together. Caution: the added leverage could put you into the bolt breaking zone, so be careful with stubborn fasteners.
Torque to Specification
Always torque to spec. If you’re going to buy any specialty tools, make a torque wrench one of the first. For chassis work, you’ll generally need a 1/2-inch drive, which usually go from 50 to 250 lb-ft. For more precise work you’ll need the smaller 3/8-inch, which typically ranges from 15 to 75 lb-ft. Torque wrenches are precision tools, so remember to keep them clean, safe from damage and properly calibrated.
Summary
When completing any DIY repair job, it’s a good idea to document your steps. For example, take photos of the disassembly process so you can reference them if you forget how something goes back together or if you need a reminder of the proper routing of cables and hoses.